Tips & Tricks: Acumatica 1099s
Acumatica 1099’s
Acumatica operates as a one-stop shop for any 1099 needs you may have for your vendors. You can print out individual Acumatica 1099s, bulk print, and even e-file your 1099s and 1099 NECs with the appropriate agencies at year-end. Year-end procedures and reports can vary from company to company, so you’ll want to check with your accountant before proceeding if you’re unsure of your individual company’s requirements.
The steps outlined in this article assume you have necessary security access to Payables.
Marking a Vendor as 1099
You can easily mark any Vendor (at any time) as a 1099 Vendor on their Vendor profile in the Payables module.
Simply press the ‘1099 Vendor’ checkbox on the General tab. Once pressed, you can also select the most common 1099 Box that payments will be in.

Whatever you select in this box will be the default box that populates on Bills and Payments for this Vendor. You are NOT locked into this box – you can change it as needed on specific bills.
1099 Bills and Payments
Now that you’ve created a 1099 Vendor, you’ll see when you create a Bill for this Vendor:
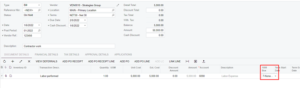
Box 7 will automatically populate in the field ‘1099 Box’.
Remember, it’s not about when you receive the bill, it’s about when it’s paid. If your bill is dated 2021, but you pay in 2022, then that payment will show on your 2022 1099’s.
Once you have processed all your payments for the year, you’re ready to print out your 1099s for your Vendors. There are two different possible 1099s to print – the 1099-MISC and the 1099-NEC. The NEC is for any Box 7 payments, and the MISC is for the rest of the boxes. This does mean that one vendor could get two different 1099s if their payments classified as, for example, Box 1 and Box 7.
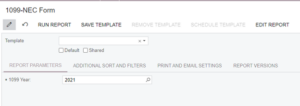
Printing 1099s
Printing your 1099s for the year is very straightforward. Simply navigate to the ‘1099-MISC Form’ and the ‘1099-NEC Form’. Choose your year:
And Acumatica will prepare your 1099s for printing. 1099s are required to be printed on the official forms from the IRS so Acumatica prepares the document to properly fill in the boxes on the form during printing. You can check your 1099s for accuracy before printing here or by running the ‘1099 Year Summary Report’.
*Important Note*
It is very common that you’ll get to the end of the year and you’ll notice that either a Vendor is missing from your 1099s or there are some payments missing and the amount seems off. Acumatica makes fixing this very easy. If your Vendor was not marked as 1099 on the Vendor profile, simply mark that Vendor as such. Once you’ve done that, look through the Bills from that Vendor for the year and mark the ‘1099 Box’ field as the appropriate box. Once you’ve done that, re-check your 1099 numbers.
Closing the Year
Once you’ve printed your 1099s, the last thing to do is close your 1099 year. This is only done after all 1099s are finalized and printed. This will prevent you from accidentally printing duplicate records. Once closed, the year cannot be reopened. To close the 1099 Year, simply hit the ‘Close 1099 Year.’ Select that appropriate year in the field at the top:
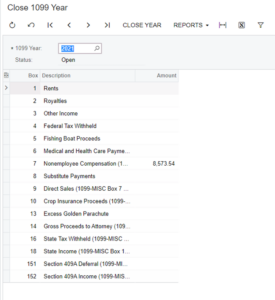
And you’ll see a summary of your year’s 1099 information. Simply hit ‘Close Year’ at the top, and the 1099 Year will be closed.
Reports
Acumatica has a few useful 1099-related reports for you to use. The ‘Open 1099 Payments’ report will give you information on any payments in the system that are in the ‘Open’ status that classify as a 1099 payment. This is extremely useful at end-of-year to make sure you’ve squared away all of your payments to vendors. The ‘1099 Year Details’ will give you a full breakdown (for a given year) for each vendor and each 1099 bill they’ve sent you. These reports will be very useful to check your forms for accuracy.
*Note*
If you have over 250 1099 Vendors, the IRS does require you to e-file. There are a few steps outside of Acumatica you’ll need to set up first before you can do that. You’ll need to set up a FIRE system account with the IRS and get a TCC. A representative of your company would use Form 4419 to apply for a TCC. You’d also need approval from the IRS to use the FIRE system and test your connection.
Have your accountant confirm all of your information as correct on the Companies screen (CS101500) and make sure the ‘1099-MISC Reporting Entity’ checkbox is selected on the Company Details tab. You’ll also need to input your TCC and contact information on the ‘1099 Settings’ tab. Have your accountant confirm all of your information. Once that’s done, you should be ready for e-file.
Strategies Group Support
We hope that you found this post on Acumatica 1099s informative and helpful. If you have any additional questions our support team would love to help! If you do not have SGI Support would like more detailed help with your system contact us today and we can get you enrolled in our support program.
Written by John Boren, Solution Consultant.